Tuesday, January 31, 2012

Attractive Men Style...

 Heres my favorite mens style (lately...it always changes)


...You get the idea. 

What is your favorite style for men?
{L}

Monday, January 30, 2012

Pure Pigment!

Aveda has done it again! 

They have reformulated their color line to make PURE PIGMENTS!

If you are into Violets...


Oranges

Reds


Purple


Green/teal


 pink


Yellow


or blue


Aveda has it all!

Come into Aveda Institute and check it out! 
Student id #86838! Let me know!!


{L}


Sunday, January 29, 2012

Subscriptions.

Today, I am sharing with you my favorite e-mail subscriptions. They are the ones worth filling up your inbox.

In order to stay up-to-date on changes going on the with the little guy, I rely on e-mail subscriptions. In the beginning of this pregnancy, I always knew what week I was and would even look ahead in the next week. Now, I have so much going on and there aren't major growing developments happening week-to-week. The e-mails also help remind me of my week! (Terrible, right?)

I have signed up for way too many, and below are my favorites. They give me an inside look on what's going on with my little guy this week, his size, and what's going on in my body. It's the perfect summary update. Besides my weekly update, I will also get newsletters throughout the week with valuable information.

1. Baby Center. This is my favorite. This also will last and give you updates on your child after pregnancy. Besides the great e-mail updates, the website is very useful between their many articles and forums. You can see what other mom's at your stage are experiencing right from their mouths.

2. Planning Family. This one also has great updates, but even more than that, links for free items! Within a few days of signing up, you get a code for a free photo canvas. I also have gotten a nursing cover and a sling for free through here. They have regular promotions.

3. The Bump. This website is a branch from theknot.com I loved The Knot for my wedding, and now I love The Bump for my pregnancy. I am a fan of their newsletters!

After baby comes here are a couple of my favorites for cute, affordable clothing. I try not to look at them too much right now since saving money is priority! They will, however, be a weakness after the baby comes.

1. Totsy. This website has everything. Baby clothes, mama clothes, and accessories for everyone at a crazy low price.

2. Zulily. Great, adorable kids clothes!

Then throwing one in for the chef/decorator inside of me. I absolutely love the recipes and other ideas that this subscription website offers. They will send you recipes that go a long with the season/holiday (like the Super Bowl - best game day snacks), best places to visit, and decorating ideas. It's all found at Midwest Living.

Enjoy!

{S}

Saturday, January 28, 2012

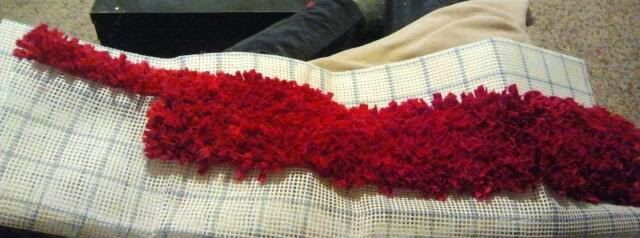
Rug Update!

Well, here it is. My progress. It may not look like much, but there it is in all its glory. Respresenting a few hours.

via mobile
 I have at least reached side-to side. I am now nearing the end of my 6 yards of strips and in my opinion, it hasn't stretched as far as I would like it to. That's just the way the cookie has crumbled.

First snag in the project- I went to buy more fabric and they didn't have the right color. When I made my initial purchase, there were 3 bolts. Overjoyed, I had to decided that I would try again, just hoping they would get another shipment. I am nearing the end of my stash and may just have to be at an unfortunate stand still.

On a brighter note, I purchased an extra latch hook hoping I could snag an unsuspecting crafter victim to help me. No real interests except for my kind-hearted mother. I am hoping I have warned her enough to the tedious-ness that this project entails. I may make its sound like a terrible beast, but in all reality, when you get into a rhythm it's quite a satifying project. So if you're interested.... :)

I keep thinking about it being finished, and how great it will look. For now, it's my ultimate motivation.

{S}

Friday, January 27, 2012

Curl Up and Dye...

Can I just say how much I'm loving school at Aveda Institute? 
I love school at Aveda Institute. :)

I started a new phase at school this week... yesterday we had evaluations from our last phase and I got an awesome grade... my client upgraded her service, purchased product , made her next reservations and I got 100%... I than proceeded to Spyhouse Coffee Shop and finished my homework... followed by my sisters place giving a mens cut to my brother in law and his brother and in return was given a CAMERA

Can we say awesome day? I sure dang hope so!

Brother in law! I made him trim his beard when I was done!


Brother in laws brother!


Now, I look forward to turning my red-headed friend into a blonde on saturday!!

I love doing hair!!!


Come on in to Aveda Institute Minneapolis to see me!

{L}

Wednesday, January 25, 2012

The Bear.

Last night I had a terrible dream. My dog had died. It was set in the future- she already had adult puppies and we kept one. I had all sorts of feelings- sadness and anger being at the top of the list. We kept one of her puppies and I kept saying it looks like Kona- but it's not the same. I wanted Kona back.


I have had this realization lately of how much I care about this silly, stinky animal. I am also wondering- how can we more easily adjust her to the baby? I have read about it- bringing home dirty clothing or blanket with the baby's smell on it to the dog before you arrive, petting the dog while you hold the baby, etc. I hope it will go smoothly.


I can't even believe the joy she has brought to us over the last few months. There is honestly nothing like coming home with the greatest greeter of all time. She constantly makes us laugh with all of her weird manorisms- she is definitely not lacking in personality. I love the sense of purpose she gives us when we feel like doing absolutely nothing. I love the way she stares at us in the middle of the night when she can't sleep. I love the way she acts like she is the laziest creature on earth and she is practically moving mountains trying to step up onto the couch. I love the way she rests her head on my knee when she is bored. I love watching Kyle and her, as if they have were always meant to be best friends- they really are two peas in a pod. I can't imagine life before her.

Love my Kona-bear and all she gives us. What a perfect companion. So glad to wake up and see that she is still here.

{S}

Grand Granola

Here is the recipe for my absolute favorite granola- mastered over the years by my mom, respectively the health nut. She has taught me a lot over the years having to do with nutrition, not saying I always abide, but highly respect her input, as well as try to follow it. If you saw her, you would want to eat just like her.She does a lot of "It may not taste good, but it sure makes me feel good." Having great blood sugar levels has had a hand in this motto. The amazing part, is she has mastered the art of taste and health. Any recipe I receive from her I know will be good for me, as well as it tasting delightful.

 She makes this granola in large batches and then cans it into serving sizes. I also used this granola in my granola bar recipe found here. My favorite is on yogurt. If you really want to get wild, do a layer of yogurt, then a layer of applesauce, granola, and top it off with fresh banana slices.

Granola

10 C whole oats or combination of oats, barley, rye & wheat flakes
1/3 C wheat germ
1 C each of:     sunflower seeds
                        almond slivers
                        walnuts
                        dried milk
                        honey
                        light olive oil
10 t. each of:   vanilla
                        cinnamon

350 degrees in roaster pan—check every 10 minutes

After baked, add dried fruit of choice, coconut, dates, raisins, etc.

You can always mix and match- adding things, removing things- all custom to what you like. I would just have to say that this is an excellent recipe.


Thanks Mom!

{S}

Monday, January 23, 2012

Weekend Sweater Pillow

I have always admired knitted throw pillow covers, and always wanted to make one. With too many projects, and too little time, I opted for a different option than knitting my own. I thought I would used an old sweater.

I took a trip to Savers and found two sweater that would work for the look I am going for.
I would recommend using a men's large or extra large sweater, but I couldn't find any on that say that would work for me. I headed over to the ladies department and found these two. I am still debating on using the sweater on the right. The one on the left is size small, and just about completely unpractical for this project. But, I fell in love. I thought the pattern was like nothing I have seen and thought it would be awesome for a pillow cover. I also spend more than I would have liked to... This sweater would only work for a smaller oblong pillow due to its small size.

I cut off the arms on the OUTSIDE of the seam to help prevent the sweater from fraying. I then fitted the sweater onto the pillow. This is the neck and arm side.
Here is the bottom of the sweater. If the sweater was a little longer, I would have sewn it together above the ribbing on this side. I would have loved having 3 big wooden buttons as an accent, but space unfortunately didn't allow!
I had to sew by hand. It gave me a little more maneuvering power, plus my sewing machine wouldn't have made it through the thick fabric. It surprisingly went fast, which is a big plus.

And here it is... finished!

Since I put it down and took a picture the moment I finished, I had not yet fixed out the lumps and bumps. It will need a little reshaping. Overall, very happy! Now I can change out my winter pillows with my summer for added season decorating excitement.  Ah, the simple joys in the life.

Cheers to short projects done in a day.

{S}

Wednesday, January 18, 2012

The start of many projects...

My name is Lindsay and I'm a Pinterest addict. 

And so this blog begins... Breaking Wine Bottles.

Here's what you'll need:

1. Wine Bottle(s). The lighter the color bottle the easier it will break. 
2. Acetone. or nail polish remover with acetone in it.
3. Yarn. Color does not matter. 
4. lighter
5. Dremel (optional)
6. Diamond bits for glass cutting (optional)
7. duct tape (optional)


Getting Started...

(Optional)I would do this part if your bottle isn't breaking with just the yarn. 

Take the duct tape and using the straight edge, wrap around the bottle where you want to mark with the dremel.


Now, I put on glasses and a face mask to prevent from any glass shards attacking my face. Even though you just want to mark it with the dremel, safety still comes first. 

Using the dremel with a diamond bit in, trace your straight edge from the duct tape, around the bottle. 

Up until now, Id say is optional. I would try this next part first to see if your bottle breaks without having to dremel. The lighter the color bottle the easier it will break. 

Take the yarn and TIGHTLY wrap it around the bottle about 3-5 times where you want the bottle to break. Cutting off the loose ends once knotted.

Slide yarn off bottle and dip in acetone.


Once yarn is soaked, slide back onto bottle where you want it broken (where your dremel mark was made)


I used my sink, you can use a bucket, but you need REALLY COLD WATER! Fill it up. 

I grabbed the bottle by the neck, held it so the bottom was higher than the neck to prevent from burning my hand (lets stray away from that). Take the lighter, holding the bottle over the water (again... safety measure) and light the acetone soaked yarn. 


Once lit, I took the bottle and kept rotating it so it would be equally heated all the way around (not sure if it made a difference). Once you notice that the flame starts to go out, dunk it in the cold water. You should hopefully hear a cracking noise and see the bottom of the bottle break off nice and fairly smooth. 


IF, by chance, it does not break off, wipe the bottle off, take the yarn off and try it again. Having the bottle go from hot to cold so quickly is what makes the bottle break. More times you do it, closer your getting to it breaking. 

Almost done!
The edges are going to be sharp and whatever your project, It might be best to smooth those out. So, off to home depot I went. 

Now, I'm not sure about you but the second I walk into home depot or menards my mind goes into a flurry and I suddenly go into slight panick attack mood cause I have no idea where to go... Guess that's how a guy feels when walking into a salon or Victoria Secret. Thankfully, Home depot always gives such excellent customer service that I was able to get in and get out of there as soon as i could, taking with me...


This was about $2 for a huge roll and i didn't even use a lot of it on 6 bottles. I would prefer this over basic sandpaper because this is a cloth, so the sharp edges aren't going to cut right through it. 

Take this, sand those edges, rounding them out enough so you don't cut yourself or others. 


For a nice finishing touch, I took an exact-o knife and cleaned up the edges of the neck. 


Sorry this image is so blurry.

I'm not sure about you but this opens up a whole new world of projects!

So, have fun, be safe, and stay tuned for my next project. Bet you can't guess what I'm going to use.


P.s. I did not drink all the wine out of these before cutting them. 

It helps knowing someone who works at a restaurant where they are just going to recycle them anyways!    
{L}


Monday, January 16, 2012

Nursery: The Art

I can't draw, I can't paint. It really makes me sad when I think about it. It is a talented I have always coveted. BUT, I found a way around it. Enter once again, the over head projector.
Isn't it a beaut?

I found an image I liked on google, printed it out on a clear transparency sheet, and projected it onto my canvas.


I then began to trace the lines. I found sale acrylic paint at Micheal's Arts & Crafts, Americana brand only 77 cents!


I then turned off the overhead projector, and began to fill in the lines.


You will have to check back when I do a nursery reveal- the canvas looks great above my changing table. I plan on doing this art project once again above the crib. This is my absolute favorite way to decorate my walls on an extrememly tight budget- plus the options are endless!

{S}

Partying here!